November 22, 2015

METT-T Analysis

I have written about METT-T before in my Estimate theSituation  post, but I thought a more thorough explanation with a few examples would be valuable.
_________________________________________________________________________________

Prior to every battle, and in some cases during the battle, I will conduct a METT-T analysis.  METT-T (pronounced: met-tee) stands for Mission, Enemy, Terrain and Weather, Troops, and Time.
 

Conducting this analysis will give you a fairly complete picture of your mission, the ground you are fighting on, the enemy force compared to yours, and the time available to conduct the assigned task. 

I highly recommend you go through this analysis at least in some way prior to starting any scenario, a sentence or two on each will be far superior to just jumping in and starting a game without taking a few minutes to think about it first.


An example of a rudimentary METT-T analysis was done for my Germans v SMGs in Woods AAR with C3k , in this scenario I just took a few minutes and made some short comments to give me a more complete feel for the task before me:

METT-T:
Mission:
Delay the enemy in zone and cause as many casualties as possible while trading space for time. Basically make it uncomfortable as possible for my opponent, who I know is very aggressive. I hope to use that against him.
Enemy:
The enemy force is made up of one complete SMG Company, plus one extra SMG Platoon in support. That adds up to 127 enemy soldiers, all equipped with SMGs.
Terrain:
The map is a cropped down version of the map Elvis and I played on in the BETA AAR. When cropping it I concentrated on ensuring that most of the playable area was wooded so we would be forced to stay true to the test.
Looking at the map, it really has two main avenues of advance. I expect Ken to break his force into two parts and attempt to spread my defending force thin... however, I plan on concentrating on one side, with only a split squad on the other as an OP/LP. The goal is to concentrate on one enemy force, annihilate it and then switch to the other, a mini-Tannenberg if you will.
Troops:
I was bringing two Fusilier Platoons to the party, my force make up was:
88 soldiers, only 20 of which have SMGs, there are a total of 6 LMGs, and 4 HMGs (2 per platoon). The rest are armed with single shot rifles.
Time:
Not that it matters, but we had one hour allotted to fight it out.

This amount of detail is normally sufficient for most scenarios; it forces you to at least think a little about your assigned task.

Note that in the above example that I created this scenario as a test so I had a much more complete breakdown of the enemy force than you normally will.  In most cases you must glean from the scenario briefing any clues on the enemy force composition you can find.  The enemy force composition breakdown should be added to, confirmed or corrected as you play and uncover enemy units.
_________________________________________________________________________________

The example that follows as I explain each component of METT-T is from my CMFI BETA AAR against ChrisND, Clearing theNiscemi Highway.  In this case the battle had been ongoing for quite some time before I sat myself down to think about what I was facing and why I was struggling (I had been losing to this point).  This also coincided with my German reinforcements that came in to support the on-map Italians who were way over-matched by Chris’s American force.

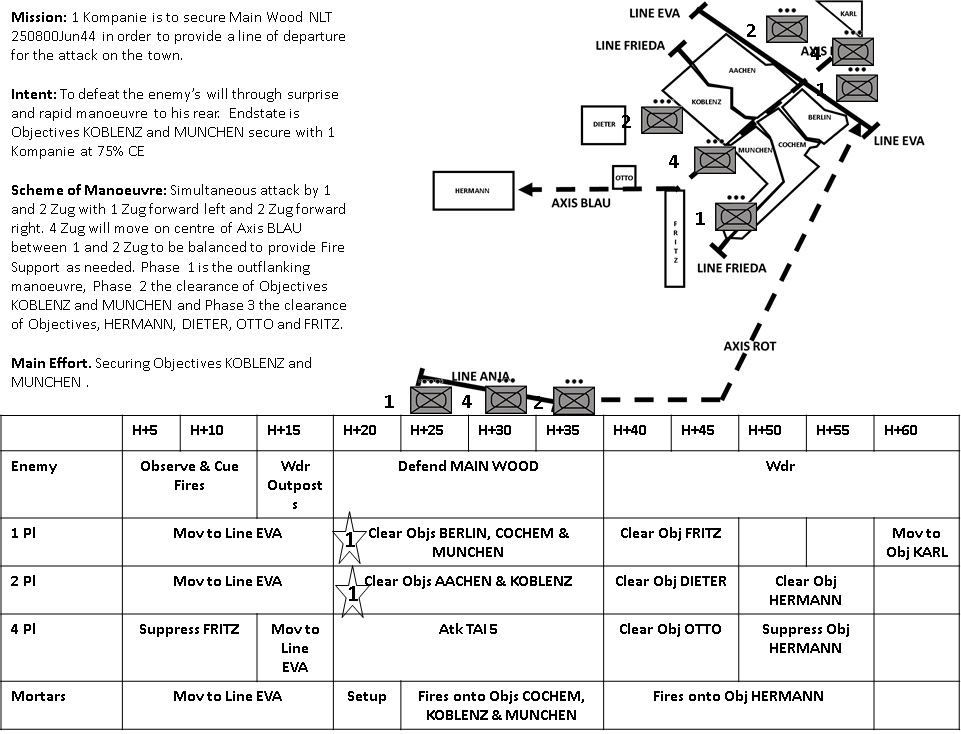
MISSION – when analyzing your mission you need to ask yourself several question, and attempt to honestly and realistically answer them.  If you can answer any of the following make a note of your answers to each.
  • What is the main mission of the scenario?  For example, defend the town, attack the ridgeline and clear the zone, etc.
  • Are there any mission specific tasks?  For example, kill the enemy armor; do not lose more than 15% of your force, etc.
  • What are the mission essential tasks?  For example, what objectives need to be captured or defended, what is the type of each objective (i.e. touch, occupy, preserve, etc.)?
  • What constraints and limitations does your force have?  For example, is your force mainly leg infantry, while your opponent has a mostly armored force?

Example of a Mission analysis (from Clearing the Niscemi Highway AAR :

MISSION

What are the maneuver objectives?
·         The Orchard - Achieved, but abandoned - Must re-occupy
·         Secondary: The Hill -       Heavily occupied - Somewhat attritted - Forward slope position
·         Main: The Villa - Strong defensive position - Will require strong attack by fire element to enable a force to capture
The mission briefing:
“Capture the three terrain objectives. Inflict heavy losses on the enemy while sustaining little of your own.”
Analysis:
The initial Italian force has taken severe casualties, so the second half of the mission objective is off to a bad start.
I have occupied the Orchard objective, but was forced to pull off of it because it was becoming a tenuous position and every minute I stayed there cost me more of my combat power.
Capturing the other two terrain objectives will be a tough chore. I must wait for my final reinforcements to arrive before that is going to be even remotely possible, mainly due to the quality disparity between the forces, especially the armored components.

ENEMY – the questions you ask yourself about the enemy must be continuously revisited as you come into contact and uncover information.  I cannot emphasize that enough.  At game start you only have the scenario briefing to rely on and often the enemy force composition is incomplete or even misleading.  Use that as a basis then correct, confirm, or add to it throughout the game.  Always maintain as clear a picture of the enemy order of battle (OB) as possible.  Use the game’s scenario editor to compare the recovered enemy OB to different organizations to attempt to determine the type of force you are facing.  This can also help you predict what you have yet to find and will most likely still have to face.

Continuously ask yourself these questions:
  • What are his intentions?
  • What do you know about his force capabilities?
  • What do you know about the enemy order of battle (OB)? Note: you will continually add to your knowledge of the enemy OB as the game progresses.
  • Does the enemy have any strengths that you know about (i.e. is he expected to field Tiger tanks)?
  • What do you know about the equipment he is using?
  • Does the enemy have any weaknesses you know about (i.e. is the enemy entrenched, thus immobile)?
  • What are the enemy’s most obvious Courses of Action (COA)?
Example of an Enemy analysis (from Clearing the Niscemi Highway AAR:

Note, this analysis was conducted partway through the game and is a good example of an in-progress recovered enemy OB.  Note entries in parenthesis and with a question mark.. these are elements that have not been spotted, but because I have a template of the PIR Battalion OB I know what should be present and I plan for those elements being present whether they turn out to be there or not.

ENEMY

Current recovered enemy OB:
·         Battalion PIR HQ – overall command – Villa
·         Demolition Platoon (-)
·         Plt HQ – eliminated
·         Bazooka Team – eliminated
·         Demo Section
o   Team A – eliminated
o   Team B – eliminated
o   Team C – still kicking, one known casualty
·         Parachute Company (-)
§  Bazooka Team – Hill
§  Pack Howitzer A – right side – Hill
§  Pack Howitzer B – left side – KOed - Hill
§  HMG Team - Villa
§  Airborne Platoon
·         Platoon HQ – Hill – moved off the Hill
o   1st Squad – Hill – moved to Villa
o   2nd Squad – Hill – possibly moved off the Hill
o   (1st Team MMG) - ?
o   2nd Team MMG – Hill – possibly moved off the Hill
o   3rd Team – Light Mortar – Hill
·         Reinforcement #1
§  Sherman Platoon – (only one seen so far) – located on the ridge at the back end of the map. If only one came in then I can expect the rest of the platoon to arrive with the second batch of reinforcements
§  MMG Team – last seen heading towards the Villa
§  Assault Gun Platoon
·         (HQ Team) - (?)
·         (1st Halftrack) – (?)
·         2nd Halftrack T30 HMC – Hill/Villa
·         3nd Halftrack T30 HMC – Hill/Villa

Analysis: the American force has proven to have overall superior firepower and lethality to my Italians. The T30s are deadly, though if I can get some mortar fire on them they can be knocked out. I have nothing on the map that can take on the Sherman right now. Until I get something that can engage it with a chance of taking it out I will avoid the sector that it oversees.

TERRAIN – analyzing the terrain is probably the most important component of METT-T in my opinion.  Understanding the lay of the land and the obstacles it imposes along with the benefits you or your enemy can get from it can win you battles.   I will include as many maps as I think are necessary to complete the picture of the terrain.

What type of terrain are you operating in? For example, mostly urban, mountainous, wooded, etc. Note: this will get more detailed treatment in the OCOKA section. 
  • Where are the objectives? 
  • Where are the main heights? 
  • Where are the lowest elevations? 
  • What terrain can be determined to be “Key terrain”, that is, what terrain could turn out to be too important to be ignored? 
  • What areas have the furthest lines of sight (and thus perhaps the best ability to contain long range fire assets)? 
  • What are the enemy’s likely main avenues of approach? 
  • What are the your best main avenues of approach? 
  • What terrain is most defensible? 
  • What is the weather? 
    • What is the temperature (i.e. hot, warm, cold, snow, rain)? 
    • From which direction is the wind blowing and how strong is it? Note: this is very important information and should be referred to when plotting smoke missions and predicting how quickly dust and smoke will dissipate.

Example of a Terrain and Weather analysis (from Clearing the Niscemi Highway AAR :
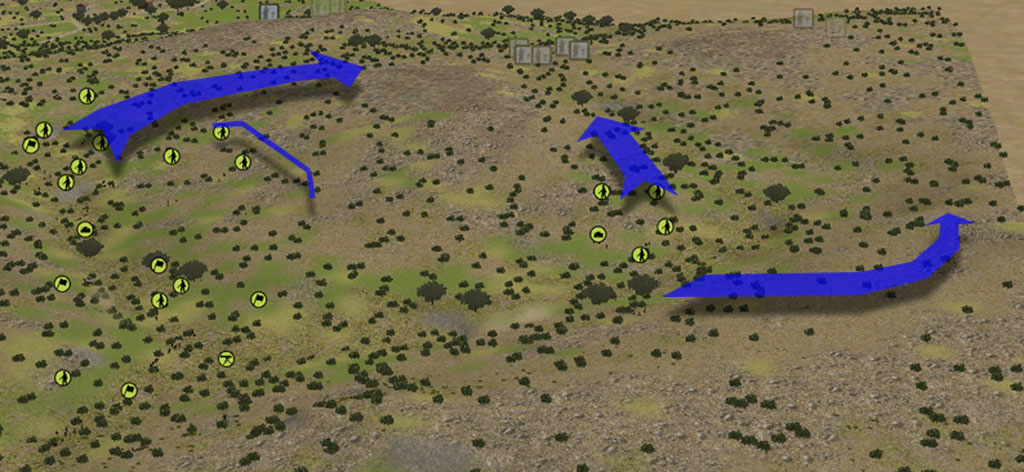
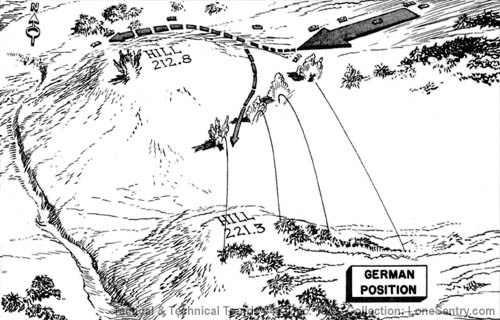
TERRAIN

Elevations and Objectives
Looking at the terrain it becomes clear where the high ground lies (blue contours) and the lowest ground (red contours). In this image the three objectives are also illustrated.
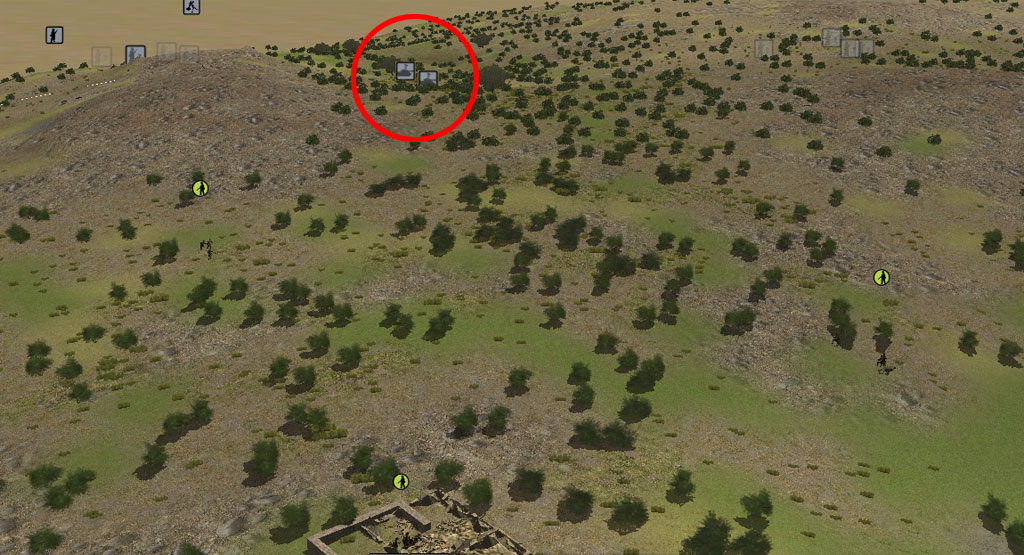

Key Terrain

Key Terrain 1 (KT1) dominates the entire southern part of the map and from it Normal Dude can deny my use of any southern approach.
KT2 is still advantageous ground.. the problem I had before is that I could not place enough firepower on it from which to dominate the US positions in the Villa and on the Hill objectives. It still looks down on both of these objectives and can be used as an attack by fire position.
KT3 is one of the few covered high points on the northern approaches that will allow me to lay fire on both objectives.
KT4 could provide a covered approach to the objectives, as well as numerous hull down positions for my armor support assets
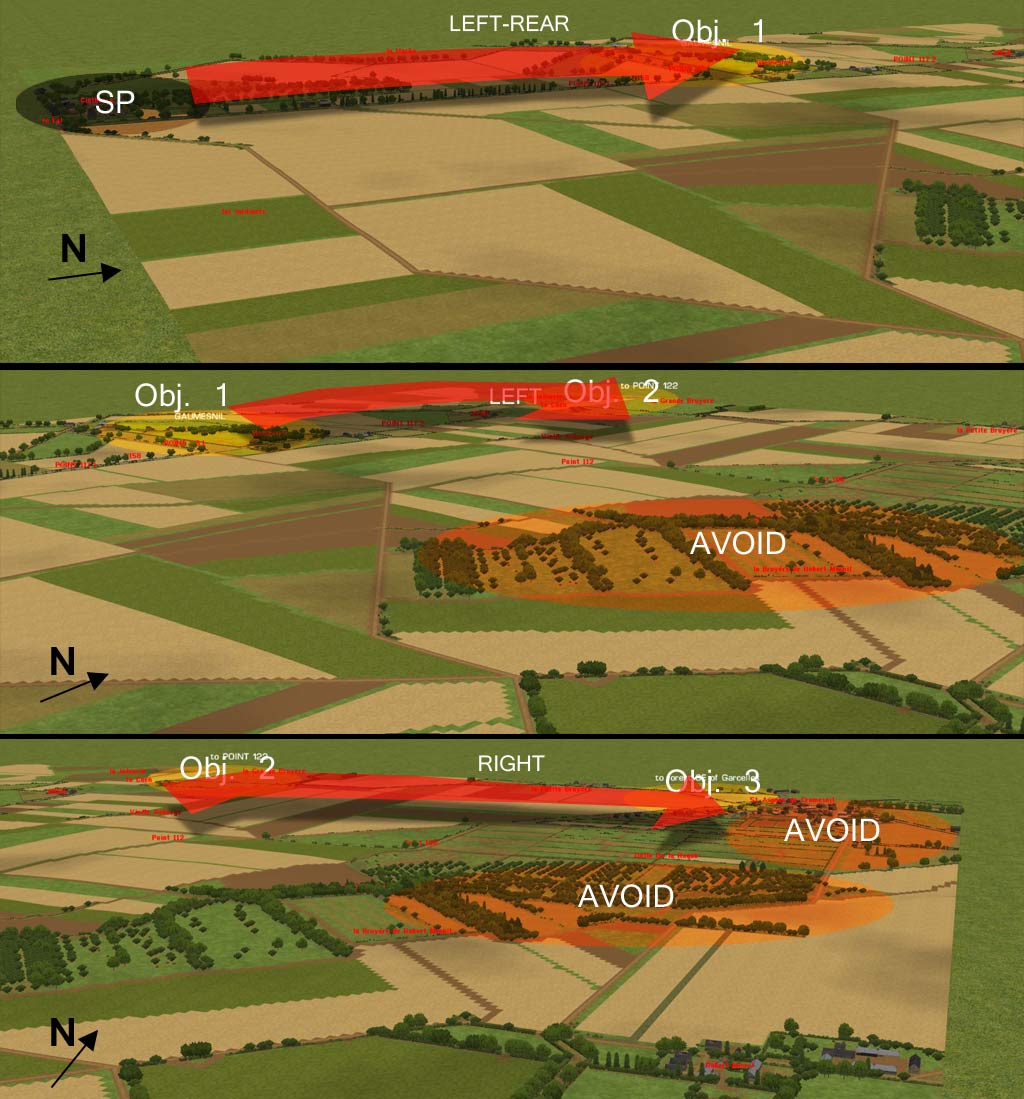
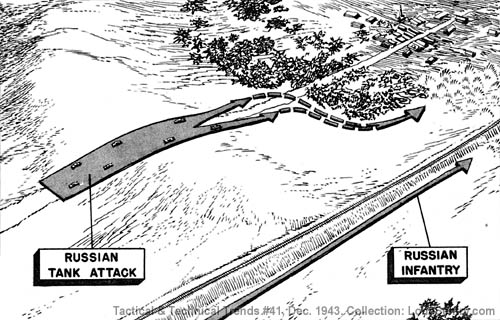
Avenues of Approach  

I have identified three main avenues of approach:
Avenue of Approach 1 (AA1) takes advantage of the low ground to try to close with the enemy.
AA2 is more exposed but could allow a fast moving force to close onto the objectives.
AA3 currently is closed by the enemy tank located on KT1. It is the most exposed route.
Using AA1 and AA2 exclusively provide the only routes that are not exposed to the tank that is on KT1. Any movement down these routes will need to be covered by anti-tank assets in order to deny him the chance to easily move his Sherman out of position. If he does maneuver against my movements on AA1 and AA2 with his Sherman, then that will open up AA3. I need to keep that threat as a possibility in his mind.


TROOPS – analyzing your own force might not seem like an important task, however unless you understand your capabilities you will not understand the most effective means to use to defeat your enemy. 

The questions you ask about yourself should be penetrating, honest, and realistic.  Try to determine where your strengths lie and where your capability is deficient.
  • What is your order of battle?
  • What equipment do you have available?
  • What are your strengths?
  • What are your weaknesses?
  • What resupply capabilities do you have?
  • What courses of action (COA) are available to you? I n the example I included this in the Terrain analysis section. It doesn’t really matter where it occurs, just ensure that you keep your capabilities in mind when determining courses of action.
Example of an own Troop analysis (from Clearing the Niscemi Highway AAR :

Note, in this example I did not do a breakdown of my capabilities, I really should have done this and I encourage you to attempt that analysis in your battles as well.

TROOPS

The next part of the METT-T analysis is analyzing your own troops. Mine have taken a beating as can be seen in this table. But my German forces are untouched and have yet to engage ND's forces.


TIME – Understanding and keeping in mind the time available to complete your mission is extremely important. 
  • What is the time schedule that you have to work with?  In other words, how long is the scenario, is the end time variable, etc.?
  •   At what time of day does the scenario take place?


Example of a Time analysis (from Clearing the Niscemi Highway AAR :

TIME
·         This battle is 1.5 hours in length. That is the time I have to complete my tasks. The battle is now 20 minutes old, so I have another hour (plus) to go. I should receive my final reinforcements in about 5 minutes (at the 25 minute mark) My first set of reinforcements came in 4 minutes ago and I have already lost a crucial part of that (the Semovente) so I will need to be careful when I maneuver the remainder of my force.
·         Normal Dude will be getting the remainder of his reinforcements in 5 minutes as well, so I need to be in position before those arrive and upset the apple cart.

November 13, 2015

Battle Planning

In preparing for battle I have always found that plans are useless, but planning is indispensable.
Dwight D. Eisenhower
Battle Planning is the most important aspect of battle command.  Battle planning is not the same thing as having a plan however… in fact I rarely have a firm plan in mind when entering into a new scenario.  My philosophy is to rarely plan, but at all times to be planning.  Confusing?  I’ll attempt to explain.

Entering into a battle with a firm plan in mind before you have made any contact with the enemy can make you inflexible, less able to adapt to changing circumstances, can find you attacking into the enemy's strength, and it can leave you open to a counter-move by a more flexible and fluid opponent. This type of battle command can best be related to the Command Push style of reconnaissance.

Command Push has been discussed previously on my blog:
Command Push:  With this technique you have your routes of advance firmed up and the role of reconnaissance is to clear the routes of hostile forces or gather information for the follow on forces to use as they advance down these predetermined avenues of advance.
The German style of battle command Befehlstaktik, is similar to Command Push as it also uses previously determined orders and plans. This approach to Battle Planning can include phase lines, set objectives, strict timelines, and inflexible movement orders. It can be effective when operating in an area that does not allow for flexible movement due to extremely tight terrain, or with dangerous open flanks. For an example of this type of battle (at least in the opening stages) see my AAR – Wittmann’s Demise.

In this game I advanced down fixed routes against objectives arrayed in a linear fashion in front of me. This scenario had restricted terrain on the left of the map and a wide open area to the right that contained an urban center and very thick woods... I expected a counter-attack to come across that open ground and my whole scheme of maneuver was towards being prepared for that when it finally hit.
 
Another successful example of this type of battle planning was Combatintman’s Planning Tutorial on the Battlefront forum. If you have not read that tutorial then I highly recommend you go to the link and read it, then come back and finish reading this post.

Here is the detailed sync matrix from his tutorial:


In his tutorial Combatintman breaks down in terrific detail a real world professional approach to battle planning and in this case it was very effective. However for this type of thorough planning to be most effective you really need the following:
  • Good information on the enemy dispositions 
  • Good information on the enemy intentions 
  • Good information on the enemy force composition
Rarely is that information provided in any detail for you so in my opinion to embark on that type of approach to planning will not normally be effective and could get you into trouble against a competent opponent.
_________________________________________________________________________________
The time to take counsel of your fears is before you make an important battle decision. That's the time to listen to every fear you can imagine! When you have collected all the facts and fears and made your decision, turn off all your fears and go ahead!
George S. Patton
I go into most battles without a plan in mind; I let the unfolding circumstances guide my movements.  However I will normally have a reconnaissance plan in place.  I will usually advance across a wide front with widely scattered teams in order to try to get a picture of the enemy positions.  If I am on defense I will try to have a wide picket line of isolated teams well in front of my defensive positions with the intent of uncovering the enemy main avenue of approach.  My goal in the early stages of a battle is to gather information.  This includes:

A full OCOKA Analysis
  • O = Observation and Fields of Fire - basically how well can you spot from key positions. 
  • C = Cover and Concealment - identifying where the best cover and concealment is in your area of operation can help dictate how best to maneuver 
  • O = Obstacles - obviously this process will continue throughout a scenario... as you uncover any enemy obstacles they will be rolled into your planning map. This also includes any terrain obstacles that can block, hinder, or channel movement 
  • K = Key Terrain - these pieces of terrain are what you think might be important for one side or the other (or both) in the upcoming battle 
  • A = Avenues of Approach - ideally this will include both friendly and potential enemy avenues of approach
Of course I also start a thorough reconnaissance.

This is the Estimate the Situation and Reconnaissance sections of the following chart (my Decision Process):
Estimating the Situation never ends, the battle and the field of battle will evolve and information will be updated throughout a scenario and you need to be constantly on the lookout for these changes and account for them in your planning.  In the above chart this is illustrated by the looping arrows, as your recon uncovers enemy information it needs to feed back into your situation estimate.

The Tentative Plan is really a series of potential ideas for plans that could be enacted depending on the information you receive; many times I don’t even have these in hand and let the situation dictate my approach.  From the beginning you should orient your force to be ready to act on whichever of these tentative plans appears to be best suited to the information gathered. 

The rule of thumb is to attack where the enemy is weakest… that is not a determination you can make without a complete Situation Estimate.

Even when I decide on a plan I am still never married to it and will change it at the drop of a hat if I determine that the plan is either, not going to be successful, or another juicier approach becomes obvious. 

In my first CMFI Gustav Line AAR I had made a determination that my opponent had a weaker force on my right so I planned to conduct my main assault on that side of the field…

However, as the situation developed my reconnaissance discovered that my opponent had two tanks approaching in this sector.  This changed the force balance back to his favor and forced me to reconsider my assault and I stopped most forward movement until I gathered more information and could make a plan to deal with the enemy armor.  I then implemented a severe withdrawal of troops on this sector and moved my main combat power to the center while my tanks dealt with the panzers.  In the end this turned out to be a winning move. 

Flexibility allowed me to quickly shift focus and react to events.

The bottom line: My battle planning philosophy relies on:
  • Maintaining flexibility 
  • Identifying the enemy formation (order of battle) 
  • Identifying the enemy defenses and/or movements 
  • Identifying the enemy intent 
  • Then applying that information to enable me to hit him where he is weakest with my main combat power

November 02, 2015

LESSONS IN TANK TACTICS - Anecdotes for Discussion

Originally posted on the Battlefront forums I wanted to re-post this as it contains some interesting information. The examples shown are from the East Front but I believe are relevant to any theater.
_______________________________________________________________________________

I have always contended that the Soviet army was not the mindless mass that some contend. The following two anecdotes illustrate that the Russian army could be quick on its feet and could indeed utilize its forces with synchronization, intelligence, and effectiveness.

The following report on the tactics of tanks, in cooperation with infantry and artillery, was published in Tactical and Technical Trends, No. 41, December 30, 1943.
Two examples of the use of tanks in conjunction with infantry and artillery were analyzed in an article which was published recently in Red Star. In one example the reasons for heavy casualties are indicated while the other example illustrates how a mission may be accomplished with minimum losses. A translation of the Red Star article follows:
The speed of forward movement of tanks on the battlefield is one of the basic questions of tank tactics. It is the tendency of the commander who has tanks at his disposal to make use of their mobility to increase the general speed of the unit. This policy conforms completely with modern tactics and should be followed as often as possible. However it is necessary to take into consideration all the conditions under which the tanks will have to operate. A tank maneuver must be well-prepared and it must receive all-around support. A few examples from actual combat experience may help to make this point clear.
This first example illustrates a failure, the lessons learned and identification of errors made after the anecdote are spot on.
A detachment composed of tanks, artillery and motorized infantry was ordered to exploit the success of troops who had thrown the enemy back from his main defense line. Specifically, the detachment's mission was to attack and advance 12 to 15 miles to the enemy's rear and capture a village, thereby cutting the route of the enemy's retreat.
The detachment started on its mission at dawn. The tank regiment, in march column formation, was in front. The commander of the regiment was told that security and reconnaissance units would operate along his route. Information concerning the enemy was very meager. All that was known was that our [the Russian] units, having driven the enemy back from a certain line of defense, were pursuing them in a south-westerly direction.
The tank regiment moved at high speed, preceded at a distance of approximately a mile by an advance group of four tanks. When these tanks reached Hill 212.8 they were fired on from the left flank and were forced to withdraw behind the hill.
The commander of the regiment believed that a reconnaissance detachment was operating somewhere in advance of the regiment, but he did not meet it. Later it became known that the reconnaissance and security parties had not been sent out; they had been forgotten in the general rush.
The commander of the regiment then decided to leave most of the tanks concealed north of Hill 212.8 and reconnoiter the enemy positions in combat. This was done with the help of one tank company.* As soon as the attacking forces passed by the hill, they were met with flank and cross fire; also they were bombed heavily from the air. Some tanks reached Hill 221.3 but the company was soon compelled to withdraw. However reconnaissance data which was obtained made it possible not only to determine the general character of the enemy's defense but also the location of his artillery.
In the vicinity of Hill 221.3, in different places, there were 13 guns and 7 self-propelled mounts which kept Hill 212.8 and the whole field south of it under fire. In addition, five German tanks were located.
Without the support of artillery it would be difficult to break through such a barrier by a frontal tank attack. About half an hour would be needed to bring the artillery and infantry up to Hill 212.8 and to open fire against the enemy. Since the enemy defense to the right was not so strong, our tanks could pass around Hill 212.8 and by following the ravine could gain Hill 221.3 without much interference and then be in the rear of the enemy's artillery positions.
 However, the commander of the main Russian detachment did not consider it necessary to spend time in coordinating his forces. Without waiting for the artillery and the mortars (only one battery arrived at the position in time) the commander ordered all the tanks to attack. The tanks moved forward, deployed in a line. As soon as they came up over the hill, the Germans opened intensive fire. To pass through the fire zone the Russian tanks moved forward at full speed and reached Hill 221.3 in a comparatively short time. The enemy wavered and then began to withdraw. A certain tactical advantage had been gained, but at the cost of unnecessary losses. Several of the Russian tanks had been disabled thereby restricting the possibilities of exploiting the advantage.
It may be said that this battle was characteristic in the sense of providing for a given high speed in the forward movement of tanks. The commander was right in trying to keep up the high speed of forward movement of the tanks, for the situation demanded it: but he made a mistake in hurriedly throwing his tanks against a strongly fortified antitank position. In such situations it is necessary to provide for the constant forward movement of tanks, not only to demand it.
The mistakes of the commander of the main detachment were as follows:
(1) He did not provide for proper reconnaissance during the offensive, with the result that the encounter with the enemy was unexpected.
(2) When the enemy's defense system and fire power had been determined, the commander hurried unnecessarily to attack with his tanks without the support of the artillery, of which there was sufficient quantity, but which had not been drawn up in time.
(3) The commander paid too much attention to the fast forward movement of the tanks and forgot about the organization of the battle.
So basically 1. conduct a thorough reconnaissance, 2. gain as much information as possible before committing, and 3. coordinate your forces. 

I have tried to instill these basic tenets in all of my AARs.
Unfortunately, situations like this one above may still be found. There still are commanders who continue to urge on the tanks, at the same time forgetting the elementary principles of combat organization and the fact that time spent preparation will always be compensated tenfold.
In reviewing the battle we see that it would have taken only a half hour to organize the cooperation of tanks, infantry and artillery. This would have helped not only to deliver a telling blow on the enemy; it would also have provided the conditions for a quick and deep movement toward the objective. There was unnecessary haste in throwing the tanks into the zone of the heaviest antitank fire. This restricted their maneuvers and caused unnecessary losses.
In combat there are times, of course, when it is necessary to rush forward without taking into consideration many circumstances. However, in ninety cases out of a hundred, it is possible to find the time and means to provide for a high rate of forward movement without unnecessary loss. The best method for saving time is thorough preparation of the operation and its quick execution. This method is more to the point than an undiscriminating push which is sure to end in a sudden halt. Some of the finest operations that have been carried out by our troops were characterized by thorough preparation and swift action.
Do not be in such a hurry that you lose the opportunity to most effectively utilize your force.  Many players rush any tank assets they have into action before gaining an understanding of the enemy positions and strength.  The wisdom of slowing down and gaining intelligence prior to deciding on a course of maneuver is a familiar one to the readers of this blog, at least it should be.


The second anecdote:
On another occasion this regiment succeeded in carrying out an attack at a relatively high rate of speed. Here is a brief description of this situation and the terrain.

In the direction of the enemy ran a railroad track, along which, according to the initial plan, the Russian tanks were to attack and move forward to a certain village. There was a highway at the left of the railroad track. In front of the village there were several small wooded areas. Still nearer was an elongated hill which cut the highway and extended as far as the railroad track.

Having concealed his tanks behind the hill, the commander learned by observation that the Germans had several antitank guns along the road. Also signs of the enemy were noted on the outskirts of the wooded area in front of the village which was to be attacked.
The commander of the regiment was convinced that the movement of tanks along the railroad line would be difficult since the banks of the railway-cut were very steep and there were deep, narrow channels on either side of the track. He decided to send the tanks along the highway, where the terrain was most favorable. The infantry was to follow the railroad line, maintaining fire liaison with the tanks. The plan was to neutralize the German antitank guns, which were placed along the highway, by a sudden attack.

Results were soon realized. The tanks rushed at full speed into the antitank gun positions and smashed the guns, the crews of which had scattered. Without lessening speed, the tanks broke into the woods and exterminated a number of Germans there. Most of those Germans were having their dinner when the tanks appeared and so the enemy troops were unable to reach their guns in time to fight a defensive action.

The tanks then passed around the right side of the woods and headed for the village but they were compelled to stop by swampy terrain (see fig. 2). This gave the enemy an opportunity to bring artillery into action and open fire on the approaches to the village. Instead of forcing his way forward, the commander withdrew his tanks to a shelter behind the woods and remained there, awaiting the arrival of his infantry. Then both infantry and tanks, in close cooperation, attacked the village and drove the Germans out. Thus the objective was achieved.
What amazes me in this anecdote is that the Russian commander performed a detailed terrain analyses, he used the information gained from reconnaissance in planning his attack, and then he coordinated his tanks and infantry when making the final attack. Pretty nice work, I don't care what the nationality of the force is.

It confirms a lot in my mind that these techniques are not new, they were not new even in WW2 and most Armies had similar techniques in approaching a situation.

The article finishes with:
In the first example presented in this article, the high rate of speed of the tanks did not reduce their losses, while in the second example the tanks not only succeeded in maintaining a high rate of speed but also they achieved success without loss. The reason for this was that in the first battle, suddenness of action was lacking, and also (because of the commander's haste) the tanks could not maneuver although the situation called for maneuvering. In the second battle the tank commander had ample time to prepare the attack well and to choose the most favorable direction. Although this took time, the results were excellent.

The commander estimated the situation correctly in general although it might have been practicable to have sought a different route when the tanks reached the swamp. The element of surprise had run its course; further movement had to be based on close cooperation with the infantry. This was skillfully achieved, and at the same time the general tempo of the attack was not lost. After taking the village, the tank unit pushed right on.

In conclusion it may be said that at all times the commander estimated the situation correctly, acting neither too slowly or too hastily. Well-thought-out organization during every phase of the attack produces high speed in the forward movement of tanks, no matter under what conditions they may be operating.