
The intent of this post is to highlight how effective using alternate firing positions can be when playing CM. This doesn’t necessarily have to be a defensive tactic, but even when attacking it can be a useful method to minimize the exposure and thus the vulnerability of your units.
I highly recommend, especially in the modern CM games (CMBS and CMSF 2), but in all of the WW2 games as well to use a tactic similar to the one I am demonstrating because it will:
- Minimize unit exposure to AT weapons, i.e. other tanks, ATGMs, RPGs, etc.
- Will help keep your units from easily being spotted and targeted... in contrast to taking up one position and sitting on it for an extended period of time
- Could have a psychological impact on your opponent
A Battle Position is described as:
There is a US Army document that I highly recommend 66 Stories of Battle Command, the first story is called “Company Team Knows it Sector”. It is a story about a small Company Team that using alternate firing positions and a defense in depth managed to destroy the entire elite OPFOR Regiment at the National Training Center (NTC). From the story:

Note the highlight added to the passage above. This was the same technique I used on BP 1 during my AAR as you will see.
NOTE: The image above is from a map I created of Red Pass at NTC for the CMBS game.
“...a defensive location oriented on a likely enemy avenue of approach. ... A commander's use of a battle position does not direct the position of the subordinate's entire force within its bounds since it is not an AO. Units as large as battalion task forces and as small as squads or sections use battle positions. They may occupy the topographical crest of a hill, a forward slope, a reverse slope, or a combination of these areas. The commander selects his positions based on terrain, enemy capabilities, and friendly capabilities.”It is not enough to find a good key piece of ground however, the tactics you employ from that position are key to its effectiveness.
FM 3-90 Tactics Part 3 Defensive Operations
There is a US Army document that I highly recommend 66 Stories of Battle Command, the first story is called “Company Team Knows it Sector”. It is a story about a small Company Team that using alternate firing positions and a defense in depth managed to destroy the entire elite OPFOR Regiment at the National Training Center (NTC). From the story:
"One young company commander, with five tanks, two Bradleys, and some dismounted infantry, destroyed about three motorized rifle battalions… It was absolutely brilliant."
"They killed a few OPFOR vehicles early on which caused the OPFOR to slow down a little bit. What they did following that, which was very smart on their part, was after firing a number of rounds and killing a number of OPFOR vehicles, they withdrew off of that high ground into their prepared fighting positions which were on the reverse side of Red Pass."

“It just so happened there was one tank crew in a wadi on the north side of Red Pass. One tank crew who had reconned to the nth degree and knew every inch of that wadi. As the OPFOR's assault elements and engineer assets approached the obstacle, that one tank crew started taking them under fire and killing every one of them. They would fire two rounds, duck down in the wadi, move along the wadi, come up to another firing position, fire a couple of rounds, duck down, move to another position, come back up, fire a couple of rounds and so on. So, as far as the OPFOR was concerned, they thought they had a whole platoon, maybe a company, off on their left flank, and it was one single tank that was using the terrain very, very well, and had boresighted their weapon system.”
Company Team Knows its Sector, 66 Stories of Battle Command
Note the highlight added to the passage above. This was the same technique I used on BP 1 during my AAR as you will see.
NOTE: The image above is from a map I created of Red Pass at NTC for the CMBS game.
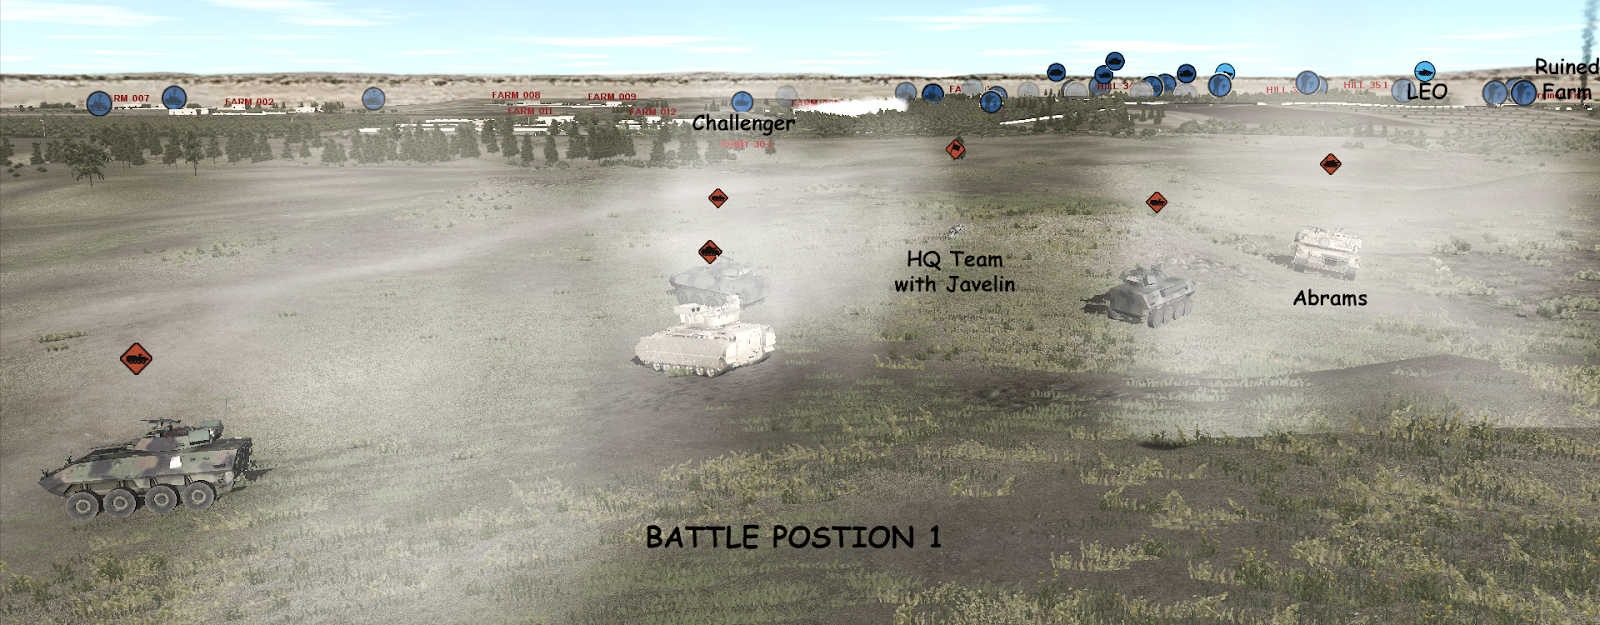
In my latest BETA AAR which was for the impending release of CMSF 2, I made use of a particularly successful Battle Position. This position, which was a minor terrain feature, actually became a massive combat multiplier for me and the death that was dealt from this position was awesome.
NOTE for this section: All quotes in this section using black text are from my AAR, Blue text indicates narrative from my opponent’s AAR.
Basically the forces involved were unique, I was commanding the US and Syrians while my opponent fielded UK and Germans. Both sides were highly capable, well half of mine was anyway... I found the Syrians to be frustrating and severely outclassed. However, only US units fought from BP1 during this fight.
In this battle, my force came on map in waves. We both started with recon forces, followed later by the Advance Guard and finally the Main Body about 10 minutes in. My original intent was to suck my opponent into Engagement Area (EA) 1 and attrit him there before going over onto the attack with my reserves. So throughout the action, the force fighting from BP1 would change as other, more capable units arrived.

Initially on BP1 I had a couple of USMC LAVs (from my Recon team) which I expected to be more effective than they ended up being.
“As LAV #4 and #1 were moving towards their hulldowns positions they both spotted one of the Marders that came in with Baneman’s advance guard moving laterally just in front of KT-1. LAV #4 and LAV #1 both spotted and opened up on the enemy IFV which suffered several hits in the side and a few penetrations.”

“Later it took several frontal hits and one partial penetration and internal spalling.
Those things are tough, but I expect it took some damage, perhaps to its weapon systems (the ATGM took what looked like several direct hits), optics, or maybe, if I’m extra lucky, to its crew or passengers.
It was reversing when I lost sight of it but not before taking several more hits. It never spotted my firing LAVs.“

“As I've done with all the German infantry, I dismount the Company HQ before their vehicle moves off to its position. It's well that I do, because Bil's keyholed [LAVs] gets a brief spot and fires (rearmost vehicle is firing at my Uncon B bakkies). He gets hits as the Marder crosses some high ground, and again when it crests the next rise. Damage is severe.”Note my highlight above... the enemy Marder never spotted my two LAVs, though I am certain they were probably spotted by other enemy units. They immediately repositioned next turn.

Though the LAVs on BP1 did shoot up one Scimitar and the Marder as shown above, they were eventually replaced by much more effective units. Eventually I would have one M1A1 on BP1, upon arrival it peeked over the ridge and...

“...M1 #2 got a good firing solution and put a SABOT right into the Challenger’s front turret… double wow… it shrugged off that hit without any noticeable damage. Good news is that this Challenger never spotted mine before the Abrams pulled back into safety.”

Note how at the end of that video the M1A1 reverses off the crest. This would be SOP for this battle:
- Move forward
- Engage
- Withdraw, regardless of the result
“M1 #2 moved into the hollow next to the little hill in BP1 in order to overwatch the Gate to Valhalla with the hopes that the Leopard that was moving in that direction would come under its guns. What it spotted instead was a Marder moving next to the farm ahead of the tank. The Marder spotted the Abrams first and opened fire with its cannon taking out the turret mounted MG, but it was not a fair fight…”

After the above action my M1 identifies another German piece of armor:

“I ordered my Abrams to immediately start to reverse while it was reloading. I did not want it to get into a gun duel if it wasn’t ready… when the gunner yelled “SABOT UP!” and while still moving in reverse the tank fired and killed the Leopard... killed him dead and was never spotted in return. I had also ordered one of the LAVs nearby to pop smoke in front of the M1 to cover it… turns out that wasn’t needed.”

So basically that illustrates a successful use of alternate firing positions while on a Battle Position. Later I would get a Javelin on this hill and kill several pieces of enemy armor, withdrawing after each contact in order to reload in safety.


“...the Javelin team that knocked out the Challenger two minutes ago now has spots on both of Baneman’s remaining tanks, the Challenger and the Leopard 2A4. Time ran out before it could launch...”BOTTOM LINE:
- The key to using this tactic is to try not to continually pop back up in the same position each time.
- For the armored vehicles especially I tried to alternate them from peeking over the crest to the key hole position behind the hill.
- In all cases except one, my units remained unspotted by the enemy vehicles they were targeting.
That 66 Stories is very interesting. Google even found me a map of the training area:
ReplyDeletehttps://www.google.com/maps/d/viewer?ie=UTF8&hl=en&msa=0&t=p&z=11&mid=1DGJThjvB_DnEZyzkOX8c-_SD5fw&ll=35.389455140041854%2C-116.58571144118821