Showing posts with label Rifle Platoon Leader. Show all posts

November 05, 2024

Rommel's "Problems for Platoon and Company" Problem 1 - Deployment

What follows is my translation (using Google Translate and some common sense) of the first Problem in Rommel's 1940 edition of "Problems for Platoon and Company". These problems/exercises were originally intended to be performed in the field, to simulate that we will be using Combat Mission Battle for Normandy. Each problem will have an accompanying CMBN scenario where you can try to learn the lesson Rommel intended.

Translated text will be in black text and my comments in blue. 

Problem 1: Deployment

Troop: 1 Rifle Platoon

Location: 3rd platoon at the end of the formation (1st Company/F.R. 1; attachments: 1 Heavy MG half platoon (two guns) and 1 spotter* team) Marching on a road to the east, approaching the eastern edge of the very dense forest (B). See sketch!

*Blinftruppe” in the original text was translated by Google Translate as “Blind Squad”, so I made the assumption that this might have been a small team to assist the heavy machine guns with target identification.


The 1st infantry Platoon is 600m in front of the company. The company commander (in charge) has just received a message from a Cavalryman. In the east, in the distance, you can hear individual shots being fired.


Intended Actions:

After the exercise has begun (3rd platoon on the march), the company commander (in charge) verbally orders the platoon leader, who has been summoned by signal: "Weak enemy identified by cavalry spearhead in Village (H) (5km east of here).”


The company begins its march outside this forest: 2nd platoon and company troops on the right. 3rd platoon to the left of the road. The Heavy MG half platoon follows the company at a distance of 300m on the road.


I will be with 2nd platoon.”


Potential Solutions:

The 3rd platoon leader orders, without moving back, either: 

a) By signal: "Direction of march left of the road", "Increase the distance between the platoons and the gap to 150m". The platoon then deploys: 1st squad in the front line stays about 150m to the left of the road, 2nd and 3rd squads follow to the right or left in staggered formation with a distance of 100m between them. 4th squad and the mortar team follow 1st squad at a distance of 200m. Platoon leader with 1st squad.”


The platoon leader informs the squad leaders about the enemy and his own intentions only after deployment has taken place. He also deploys troops for security.


Or:


b) Verbally to the quickly summoned squad leaders: “Weak enemy in Village (H) (5km from here) engaged by cavalry.


The company continues its march outside the forest with the 2nd platoon on the right and the 3rd platoon on the left of the road.


3rd platoon deploys on the march! Movement direction is towards the group of trees on the left of the road! Let’s go platoon! Security: 1st squad forward, 3rd squad 250m from the 2nd platoon! I'm with 1st squad! Repeat the orders and fall out!”


I tried, with the translation to be as faithful as possible to the original text. 

There will be some differences with the accompanying Combat Mission scenario where I adjust distances and initial setup locations. The problem remains the same, the player must deploy their 3rd Platoon, and this is the real point of the exercise, then cross the open ground in whatever formation deemed best. Then they must decide whether to continue the scenario to attack the village or not. I highly recommend playing it through to the end, and seeing if you can coordinate your attack with 2nd Platoon. 

Use the Battle Drill Tactical Toolbox as required.

Download Combat Mission Battle for Normandy scenario (Save file to the SAVED GAMES folder, then load saved game to play):  Rommel Problem 1 Deployment
Note: This scenario requires the Commonwealth Module for CMBN.

July 04, 2017

Rifle Platoon Leader – PLATOON DEFENSE Part 2 - Fundamentals

Make initial contact with the smallest force possible.
FM 3-90 Tactics
A defensive operation can occur in any battle, whether you are on the offense or not. A local counterattack by a defender when you are advancing could force you to go defensive with at least a part of your force. Or you could be the defender in a scenario, in this case you might have offensive or defensive operations occurring simultaneously.

There are three main types of defensive operations:
  • Hasty Defense 
  • Deliberate Defense 
  • Delay/Withdrawal
Defensive operations may be necessary in order to:
  • Deny the enemy the use of a piece of terrain or an area (i.e. a hilltop, a woodline, or a village) 
  • Buy time to organize for other operations 
  • Hold an area (flank or key terrain) with a small element to allow more important operations to occur in other parts of the battlefield 
  • Force the enemy to concentrate against you, thus weakening him elsewhere 
  • Counter an unexpected move or action from your opponent 
  • Attrit or fix the enemy in preparation for moving to offensive operations 
  • Assemble and prepare to start offensive operations 
  • Regain your breath - especially useful when the battle seems to be getting away from you and you need to buy time to think

Fundamentals of the Defense


As a defender you must perform a thorough METT-T analysis.  Ensure you read my post on that topic fully and understand the basics.  I cannot emphasize enough the importance of knowing the terrain, understanding your force, and having a good idea of the enemy’s capabilities and goals  in being successful in Combat Mission, this is especially true when on the defensive.

Defensive Operations

Hasty Defense - most of the time in Combat Mission we are conducting a hasty defense.  If you have to seize and hold a piece of key terrain, then that is an example of a hasty defense.  Anytime you are dropping a formation into a temporary defensive posture (after a movement, or in reaction to enemy activity) during a battle, you are conducting a hasty defense.  

Deliberate Defense - if you are playing a defense scenario, then you are usually conducting a deliberate defense.  The deliberate defense normally has engineer works (foxholes, bunkers, mines, etc.) and mutually supporting positions.  Personally I find this type of action to be very limiting and it is the easiest to be successful against for an attacker as he can identify strong points and take them down one at a time.  For this type of defense to work the commander MUST maintain a mobile reserve to enable him to surprise the attacker with local counter-attacks or maybe even a spoiling attack.

Delay - The delay usually is made up of subsequent hasty or deliberate defensive positions and is used to slow or attrit an enemy to the point where he cannot continue offensive operations.  This is actually my preferred method of defending, and it can be devastating to an attacker, but it must be well thought out with pre-identified fall back positions, and subsequent lines of defense pre-positioned along the withdrawal routes.

Depth on the Defense - NEVER put the majority of your combat power in the forward positions or on the first line of defense.  

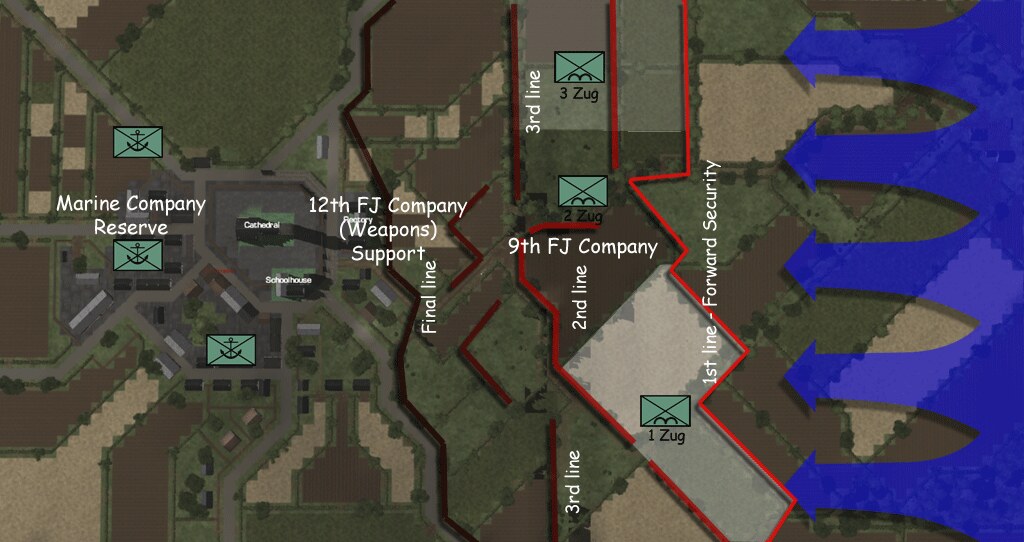
Plan a defense with successive defensive lines that you can fall back to and provide each line of defense with enough combat power to make it viable.

Example showing successive lines of defense

Intelligence - Whether on the offense or the defense it is paramount that you identify the enemy units, formations, and axes of movement. This information will be a combat multiplier that you can use to good effect as you plan on how best to meet your opponent with fire and maneuver.

Mobility - At times it will be necessary to stand at all costs in a position, but an efficient, effective defense is identified by mobility, both laterally and in depth to move forces as the situation dictates.

Flexibility
- In my opinion the single most important tenant when on the defense is flexibility, As the defender you will have no idea (in most cases) where the attacker will be coming from, as such you need to identify his avenues of approach (AAs) and his force composition as quickly as possible. Once you have a good idea as to where and in what strength he is attacking, you can shift forces accordingly.

Offensive Action - Even on the defense you should be looking for times to counter-attack or conduct a spoiling attack. This can be a tricky affair, and you have to weigh your available combat power against the enemy strength, ensuring you do not end up biting off more than you can chew.

Mutual Support
- Best case is to position your units so they can provide overlapping areas of fire and quick support for each other. In close terrain (like hedgerow country) this will be near impossible to achieve, yet this should be something you always try to achieve.

Mobile/Active Defensive Operations

I highly recommend a mobile/active or maneuver based defense, however:

DO NOT:
    • Get so excited that you go over to the offensive before you are really ready
    • Waste your main combat power in counter-attacks in areas where little information has been received
    • Overextend your forces and risk getting portions cut off from any help 
DO:
    • Use fast moving scouts to gather information on the enemy’s dispositions and movements
    • Use your main counter-attack force to break up over-extended enemy formations or to eliminate smaller enemy units or formations that cannot be quickly reinforced by your opponent
    • Conduct spoiling attacks if possible
    • Withdraw through the next line of defense if the pressure gets too great

June 21, 2017

Rifle Platoon Leader – PLATOON DEFENSE Part 1 - Introduction

132. CONDUCT OF DEFENSE. a. Successful defense is predicated
on each subordinate unit holding its area. The platoon holds its position at all costs. It never withdraws except upon the verified order of higher authority.
FM 7-10 The Rifle Company (1944)

“Hence that general... is skilful in defense whose opponent does not know what to attack.” Sun Tzu
There is precious little written about how to properly conduct a defense in Combat Mission games. Even most of my writings have been on maneuver and attack. I must confess that I find playing the defensive role in these games can be a serious challenge. Primarily because of the attacker’s main advantages:

  • The attacker almost always has a numerical superiority
  • The attacker often holds a massive combat power disparity over the defender
  • The attacker can choose where to attack, the defender has to account for all possibilities, which in most cases is an impossible task
  • The attacker has the initiative, he decides where and when any activity, movement or attacks, will occur
Many times those advantages are simply too great to overcome, but our goal, as defenders, is to make the attacker’s job more difficult and to take away at least some of his advantages, by:

  • Attriting the attacking force, ideally to a point where the attack is no longer viable, but at least to a point that forces the attacker to slow his advance
  • Keeping the attacker on his toes, in short, wrestle the initiative away from him and force him to react to our actions
  • Keeping the attacker at arm's length with picket forces, keeping the main combat power in reserve for counter-attacks or spoiling attacks
  • Ambushing enemy forces whenever possible, then getting out of the area as quickly as possible to reset in the next ambush position
  • Counter-attacking with a force large enough to cause serious damage
  • Conducting spoiling attacks on targets of opportunity whenever possible
  • Delaying - trade space for time, make the attacker bleed for every meter gained, make him get cautious, or so frustrated he gets careless
  • Maintaining a positive exchange ratio - try not to lose more than the attacker does, if that starts to happen your defense will unravel
  • Maintaining patience - trying to “make something happen” is almost always a recipe for disaster
  • Identifying the attacker’s schwerpunkt (if he has one), and planning ways to deal with it through counter-attacks, spoiling attacks, ambushes, etc.  
  • NEVER engaging the enemy strength with your strength, always look for opportunities to inflict pain by a thousand cuts, one small enemy unit at a time
  • Ensuring the attacker maintains a cautious approach and runs out of either enough combat power or enough time to complete his mission
I think of myself as an active player, so a static defense really goes against my grain and in my opinion leaves the defending player open to having his force taken apart one piece at a time.  Frederick the Great put it best when he said, “He who defends everything defends nothing”. I prefer an active defense, one that allows counter-attacks, spoiling attacks, and an active mobile force with which to react to and to interdict enemy movements.  
“Fixed fortifications are a monument to the stupidity of man.”George S. Patton
With this series of posts, I hope to explain my philosophy, show some examples from previous games, and to provide some guidelines on conducting a proper defense that will work.  Though these posts will be focused on the Platoon Defense, the concepts are scalable and can be applied whether you are commanding a Platoon, a Company, or a Battalion.

November 22, 2015

METT-T Analysis

I have written about METT-T before in my Estimate theSituation  post, but I thought a more thorough explanation with a few examples would be valuable.
_________________________________________________________________________________

Prior to every battle, and in some cases during the battle, I will conduct a METT-T analysis.  METT-T (pronounced: met-tee) stands for Mission, Enemy, Terrain and Weather, Troops, and Time.
 

Conducting this analysis will give you a fairly complete picture of your mission, the ground you are fighting on, the enemy force compared to yours, and the time available to conduct the assigned task. 

I highly recommend you go through this analysis at least in some way prior to starting any scenario, a sentence or two on each will be far superior to just jumping in and starting a game without taking a few minutes to think about it first.


An example of a rudimentary METT-T analysis was done for my Germans v SMGs in Woods AAR with C3k , in this scenario I just took a few minutes and made some short comments to give me a more complete feel for the task before me:

METT-T:
Mission:
Delay the enemy in zone and cause as many casualties as possible while trading space for time. Basically make it uncomfortable as possible for my opponent, who I know is very aggressive. I hope to use that against him.
Enemy:
The enemy force is made up of one complete SMG Company, plus one extra SMG Platoon in support. That adds up to 127 enemy soldiers, all equipped with SMGs.
Terrain:
The map is a cropped down version of the map Elvis and I played on in the BETA AAR. When cropping it I concentrated on ensuring that most of the playable area was wooded so we would be forced to stay true to the test.
Looking at the map, it really has two main avenues of advance. I expect Ken to break his force into two parts and attempt to spread my defending force thin... however, I plan on concentrating on one side, with only a split squad on the other as an OP/LP. The goal is to concentrate on one enemy force, annihilate it and then switch to the other, a mini-Tannenberg if you will.
Troops:
I was bringing two Fusilier Platoons to the party, my force make up was:
88 soldiers, only 20 of which have SMGs, there are a total of 6 LMGs, and 4 HMGs (2 per platoon). The rest are armed with single shot rifles.
Time:
Not that it matters, but we had one hour allotted to fight it out.

This amount of detail is normally sufficient for most scenarios; it forces you to at least think a little about your assigned task.

Note that in the above example that I created this scenario as a test so I had a much more complete breakdown of the enemy force than you normally will.  In most cases you must glean from the scenario briefing any clues on the enemy force composition you can find.  The enemy force composition breakdown should be added to, confirmed or corrected as you play and uncover enemy units.
_________________________________________________________________________________

The example that follows as I explain each component of METT-T is from my CMFI BETA AAR against ChrisND, Clearing theNiscemi Highway.  In this case the battle had been ongoing for quite some time before I sat myself down to think about what I was facing and why I was struggling (I had been losing to this point).  This also coincided with my German reinforcements that came in to support the on-map Italians who were way over-matched by Chris’s American force.

MISSION – when analyzing your mission you need to ask yourself several question, and attempt to honestly and realistically answer them.  If you can answer any of the following make a note of your answers to each.
  • What is the main mission of the scenario?  For example, defend the town, attack the ridgeline and clear the zone, etc.
  • Are there any mission specific tasks?  For example, kill the enemy armor; do not lose more than 15% of your force, etc.
  • What are the mission essential tasks?  For example, what objectives need to be captured or defended, what is the type of each objective (i.e. touch, occupy, preserve, etc.)?
  • What constraints and limitations does your force have?  For example, is your force mainly leg infantry, while your opponent has a mostly armored force?

Example of a Mission analysis (from Clearing the Niscemi Highway AAR :

MISSION

What are the maneuver objectives?
·         The Orchard - Achieved, but abandoned - Must re-occupy
·         Secondary: The Hill -       Heavily occupied - Somewhat attritted - Forward slope position
·         Main: The Villa - Strong defensive position - Will require strong attack by fire element to enable a force to capture
The mission briefing:
“Capture the three terrain objectives. Inflict heavy losses on the enemy while sustaining little of your own.”
Analysis:
The initial Italian force has taken severe casualties, so the second half of the mission objective is off to a bad start.
I have occupied the Orchard objective, but was forced to pull off of it because it was becoming a tenuous position and every minute I stayed there cost me more of my combat power.
Capturing the other two terrain objectives will be a tough chore. I must wait for my final reinforcements to arrive before that is going to be even remotely possible, mainly due to the quality disparity between the forces, especially the armored components.

ENEMY – the questions you ask yourself about the enemy must be continuously revisited as you come into contact and uncover information.  I cannot emphasize that enough.  At game start you only have the scenario briefing to rely on and often the enemy force composition is incomplete or even misleading.  Use that as a basis then correct, confirm, or add to it throughout the game.  Always maintain as clear a picture of the enemy order of battle (OB) as possible.  Use the game’s scenario editor to compare the recovered enemy OB to different organizations to attempt to determine the type of force you are facing.  This can also help you predict what you have yet to find and will most likely still have to face.

Continuously ask yourself these questions:
  • What are his intentions?
  • What do you know about his force capabilities?
  • What do you know about the enemy order of battle (OB)? Note: you will continually add to your knowledge of the enemy OB as the game progresses.
  • Does the enemy have any strengths that you know about (i.e. is he expected to field Tiger tanks)?
  • What do you know about the equipment he is using?
  • Does the enemy have any weaknesses you know about (i.e. is the enemy entrenched, thus immobile)?
  • What are the enemy’s most obvious Courses of Action (COA)?
Example of an Enemy analysis (from Clearing the Niscemi Highway AAR:

Note, this analysis was conducted partway through the game and is a good example of an in-progress recovered enemy OB.  Note entries in parenthesis and with a question mark.. these are elements that have not been spotted, but because I have a template of the PIR Battalion OB I know what should be present and I plan for those elements being present whether they turn out to be there or not.

ENEMY

Current recovered enemy OB:
·         Battalion PIR HQ – overall command – Villa
·         Demolition Platoon (-)
·         Plt HQ – eliminated
·         Bazooka Team – eliminated
·         Demo Section
o   Team A – eliminated
o   Team B – eliminated
o   Team C – still kicking, one known casualty
·         Parachute Company (-)
§  Bazooka Team – Hill
§  Pack Howitzer A – right side – Hill
§  Pack Howitzer B – left side – KOed - Hill
§  HMG Team - Villa
§  Airborne Platoon
·         Platoon HQ – Hill – moved off the Hill
o   1st Squad – Hill – moved to Villa
o   2nd Squad – Hill – possibly moved off the Hill
o   (1st Team MMG) - ?
o   2nd Team MMG – Hill – possibly moved off the Hill
o   3rd Team – Light Mortar – Hill
·         Reinforcement #1
§  Sherman Platoon – (only one seen so far) – located on the ridge at the back end of the map. If only one came in then I can expect the rest of the platoon to arrive with the second batch of reinforcements
§  MMG Team – last seen heading towards the Villa
§  Assault Gun Platoon
·         (HQ Team) - (?)
·         (1st Halftrack) – (?)
·         2nd Halftrack T30 HMC – Hill/Villa
·         3nd Halftrack T30 HMC – Hill/Villa

Analysis: the American force has proven to have overall superior firepower and lethality to my Italians. The T30s are deadly, though if I can get some mortar fire on them they can be knocked out. I have nothing on the map that can take on the Sherman right now. Until I get something that can engage it with a chance of taking it out I will avoid the sector that it oversees.

TERRAIN – analyzing the terrain is probably the most important component of METT-T in my opinion.  Understanding the lay of the land and the obstacles it imposes along with the benefits you or your enemy can get from it can win you battles.   I will include as many maps as I think are necessary to complete the picture of the terrain.

What type of terrain are you operating in? For example, mostly urban, mountainous, wooded, etc. Note: this will get more detailed treatment in the OCOKA section. 
  • Where are the objectives? 
  • Where are the main heights? 
  • Where are the lowest elevations? 
  • What terrain can be determined to be “Key terrain”, that is, what terrain could turn out to be too important to be ignored? 
  • What areas have the furthest lines of sight (and thus perhaps the best ability to contain long range fire assets)? 
  • What are the enemy’s likely main avenues of approach? 
  • What are the your best main avenues of approach? 
  • What terrain is most defensible? 
  • What is the weather? 
    • What is the temperature (i.e. hot, warm, cold, snow, rain)? 
    • From which direction is the wind blowing and how strong is it? Note: this is very important information and should be referred to when plotting smoke missions and predicting how quickly dust and smoke will dissipate.

Example of a Terrain and Weather analysis (from Clearing the Niscemi Highway AAR :

TERRAIN

Elevations and Objectives
Looking at the terrain it becomes clear where the high ground lies (blue contours) and the lowest ground (red contours). In this image the three objectives are also illustrated.


Key Terrain

Key Terrain 1 (KT1) dominates the entire southern part of the map and from it Normal Dude can deny my use of any southern approach.
KT2 is still advantageous ground.. the problem I had before is that I could not place enough firepower on it from which to dominate the US positions in the Villa and on the Hill objectives. It still looks down on both of these objectives and can be used as an attack by fire position.
KT3 is one of the few covered high points on the northern approaches that will allow me to lay fire on both objectives.
KT4 could provide a covered approach to the objectives, as well as numerous hull down positions for my armor support assets

Avenues of Approach  

I have identified three main avenues of approach:
Avenue of Approach 1 (AA1) takes advantage of the low ground to try to close with the enemy.
AA2 is more exposed but could allow a fast moving force to close onto the objectives.
AA3 currently is closed by the enemy tank located on KT1. It is the most exposed route.
Using AA1 and AA2 exclusively provide the only routes that are not exposed to the tank that is on KT1. Any movement down these routes will need to be covered by anti-tank assets in order to deny him the chance to easily move his Sherman out of position. If he does maneuver against my movements on AA1 and AA2 with his Sherman, then that will open up AA3. I need to keep that threat as a possibility in his mind.


TROOPS – analyzing your own force might not seem like an important task, however unless you understand your capabilities you will not understand the most effective means to use to defeat your enemy. 

The questions you ask about yourself should be penetrating, honest, and realistic.  Try to determine where your strengths lie and where your capability is deficient.
  • What is your order of battle?
  • What equipment do you have available?
  • What are your strengths?
  • What are your weaknesses?
  • What resupply capabilities do you have?
  • What courses of action (COA) are available to you? I n the example I included this in the Terrain analysis section. It doesn’t really matter where it occurs, just ensure that you keep your capabilities in mind when determining courses of action.
Example of an own Troop analysis (from Clearing the Niscemi Highway AAR :

Note, in this example I did not do a breakdown of my capabilities, I really should have done this and I encourage you to attempt that analysis in your battles as well.

TROOPS

The next part of the METT-T analysis is analyzing your own troops. Mine have taken a beating as can be seen in this table. But my German forces are untouched and have yet to engage ND's forces.


TIME – Understanding and keeping in mind the time available to complete your mission is extremely important. 
  • What is the time schedule that you have to work with?  In other words, how long is the scenario, is the end time variable, etc.?
  •   At what time of day does the scenario take place?


Example of a Time analysis (from Clearing the Niscemi Highway AAR :

TIME
·         This battle is 1.5 hours in length. That is the time I have to complete my tasks. The battle is now 20 minutes old, so I have another hour (plus) to go. I should receive my final reinforcements in about 5 minutes (at the 25 minute mark) My first set of reinforcements came in 4 minutes ago and I have already lost a crucial part of that (the Semovente) so I will need to be careful when I maneuver the remainder of my force.
·         Normal Dude will be getting the remainder of his reinforcements in 5 minutes as well, so I need to be in position before those arrive and upset the apple cart.

July 29, 2015

Rifle Platoon Leader – PLATOON ATTACK - Part the Second

Without a plan, there's no attack. Without attack, no victory.
                                                                      Curtis Armstrong


Part IV - RIFLE PLATOON ATTACK - Part 2

The enemy force has been determined to be a larger force than the unit in contact can handle on its own but small enough that your platoon should be able to eliminate it without additional support.            

The stage is set, your platoon is in contact with an enemy unit or units that will require your entire rifle platoon to either eliminate or force from its position so you can continue the advance. 

When attacking you need to guarantee:
  • Suppression of the enemy unit(s) in contact
  •  Freedom of maneuver for a part of your force
  • Flank protection.  You must post a team (or more if required) to ensure that any open flank your platoon has is watched and protected from enemy counterattack.  If you have a support team (especially an MG team) with your platoon then this is the ideal role for them.
If even one of those cannot be guaranteed then the success of your attack will be compromised.  If that is the case then you need to either withdraw your platoon or escalate the attack into a Company level Attack.

Any attack against a defender or a stationary enemy position is best done over a wide front; this is done to make the enemy spread his defenses and thus water it down.  In this way you can then concentrate on one enemy unit or position at a time eliminating the enemy force piece by piece and create the conditions favorable for a breakthrough into the enemy rear area.  If you concentrate on one area at a time in your advance your enemy will be able to concentrate his defense.

… that general is skillful in attack whose opponent does not know what to defend....
  Sun Tzu             
Plan your attack carefully; do not just rush into an attack without confirming that you can indeed carry out a successful attack on the enemy position(s) with little or no risk to your platoon. 

Methods of Attack
  •  Frontal Attack:  when the entire platoon’s firepower is required to suppress the enemy unit (suppression is required in order to allow maneuver) you can attack frontally using Fire & Movement.  That technique can be used by the platoon as easily as it can by the squad.
    • This method of attack is favored when you cannot guarantee that a flank attack by a portion of your platoon can be performed with low risk or when the ground does not allow for a masked approach on the enemy’s flank.

o   Method:
§  Fire on the enemy unit(s) with as much firepower (and hopefully no more) than is required for suppression.
§  When the enemy unit(s) has been suppressed (IOW you are not receiving return fire or can physically see that they are taking cover), you can rush one of your teams forward a few action spots.  Use maskedmovement whenever possible.
§  Repeat the above procedure (Fire & Movement) until you are close enough to Assault the enemy unit(s).
§  Assault through the enemy… preferably one unit or position at a time (see Fire & Movement and Squad Attack Drill for the procedure).

  • Flanking Attack: this is performed by the platoon in a modified Squad Attack procedure.
o   This method is favored when a secure route to the enemy’s flank is present, including: secure from enemy interference and secure from enemy discovery (IOW a masked route is available).
o   Method:
§  Support Element provides fire support for the Maneuver Element.
·         It is not necessary to fully suppress the entire enemy position
·         Spread fire around in order to keep the enemy from guessing where the assault will occur
§  Maneuver Element moves on the enemy flank.
·         Uses masked movement
·         Stops outside the range necessary to carry out the assault
§  Assault through the enemy.
·         Maneuver Element takes up position outside the assault range (>30 m) from the enemy unit.
·         The Support Element shifts fire to fully suppress the unit or position that is being assaulted.
·         Once the enemy position is suitably suppressed The Maneuver Element starts it’s assault (see Fire& Movement and Squad Attack Drill for the procedure).

I think any student of military strategy would tell you that in order to attack a position; you should have a ratio of approximately 3 to 1 in favor of the attacker.
        Norman Schwarzkopf

When General Schwarzkopf says you need a 3:1 advantage in the attack he does not mean you need a 3:1 advantage in manpower across the entire zone, rather you need to have a superior firepower advantage only in the small zone you are actually attacking.  

What that means to us in a Platoon Attack is that you need enough firepower to suppress the enemy positions one at a time in order to successively assault and eliminate them.  You might be equal in manpower or even firepower across the entire zone, but you should be attacking the enemy one position at a time to create those zones where your fire is superior to the enemy’s.  Often I will stop a platoon advance and concentrate all fire on one enemy unit to overwhelm it with fire and prepare it for assault.

If you walk away from this lesson with only one thing, that should be it. 

Key Points:

  • Support your maneuver with support fire
  • Attack across a wide front (to spread the enemy defense)
  • Concentrate your support fire on each enemy position in succession to “eat the elephant one bite at a time” especially when the maneuver element is in position to assault
  • Assault enemy positions one at a time
  • After all enemy positions or units (in the platoon zone that have interrupted movement) have either been eliminated or forced to withdraw immediately move to continue the movement and the mission

From the Battlefront Forum:
Bulletpoint, on 31 Jul 2015 - 08:39 AM, said:
Good point about attacking on a broad front. When I started playing, I would try to find a place to smash through the front line and go straight for the victory location.

By doing that, I maximised the enemy fire on my flanks and minimised the amount of fire I could return. By going wide front, you can use gains made in one area to support troops having a harder time, and then later vice versa.

My response (thought it would be an interesting addition to this post:
Bulletpoint, yes you've got the idea. When you spread the enemy defense and probe from many directions you also eventually discover where he is weak and can then concentrate your reserve against that spot. During this process the other probes must keep the pressure on so the enemy cannot easily pull units off the line to reinforce the threatened zone. Once you start your push its going to become bloody obvious where you are striking. The hope is that you can overwhelm the enemy at that point before the opportunity is gone. You have to be prepared to make the decision quickly, as any delay will allow your opponent to react. 
Point is that you cannot make the decision on where to strike without some knowledge of where the enemy is, well you can, but your chances of success are much lower if you plan an attack without reconnoitering the area first.